Seasonal Foods: Microgreens and Indoor Gardening

microgreens-1a

One or two more days until harvest time! Under the best conditions the outside garden will start producing a harvest in 60 days. With an indoor garden, the first harvest happens in 10-14 days.

This winter as the price of organic vegetables started to climb and the contents in my root cellar started to dwindle, I started sprouting. I had a series of mason jars lining my kitchen window but the production just wasn’t enough. I bought a new sprout stacking tray but it still didn’t meet my needs. I started bulk production of mung beans but there still wasn’t enough! I realized with a family of four including two teenagers, I would have to get serious about my production.

I started looking around the internet for household or commercial growing units. I found many great units but the cost was around $500 for a household system to $4000 for a small commercial system. The cheaper units were dry. The more expensive units were automatic, wet systems with complicated plumbing, draining, misting, and timers with complex, computerized, electrical systems. To me, it looked like a lot of systems to go wrong. Being frugal, I knew we would be building our own simple, dry growing unit, likely out of scarp materials and spare parts.

It took Shaen about four hours to build the dry growing unit to accommodate a standard 10″x21″ seedling tray out of scrap materials. The growing unit was built around the a 4′ long fluorescent light and can accommodate a total of 20 seedling trays. There are five shelves with three shelves with lights. Each shelf with lights has four double fluorescent lights with a total of eight bulbs per shelf. The growing unit is on wheels and can be moved around easily. The unit is covered with a piece of reused, lumber wrap but an old cotton sheet would work well too. Being a dry system, it is important to use seedling trays that DO NOT have holes in the bottom. The unit is still not perfect but like with most of our projects, it’s good enough!

microgreens-1

Growing microgreens will require some equipment and materials. Gather together the seedling trays, soil sieve, peat moss, compost, garden soil and additives. If you don’t have the time to mix your own soil, an easier solution is buying seedling soil or potting soil.

microgreens-2

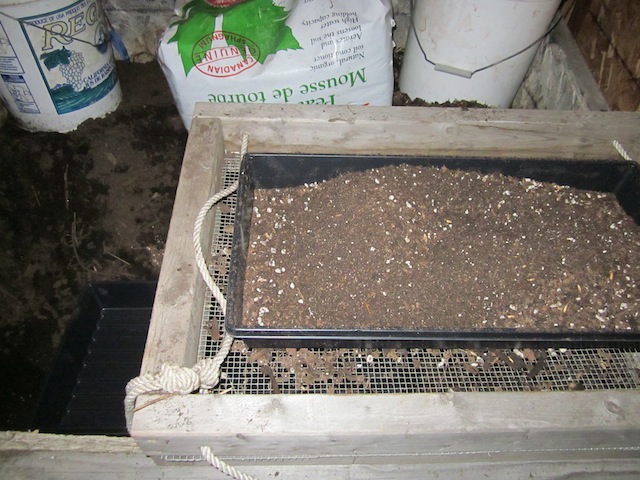
The peat moss, compost and garden soil is put through the sieve to remove any large pieces. The no-hole seedling trays are half filled. Now is the time to add dry organic fertilizers, if desired.

microgreens-3

Filling a number of seedling trays with the soil mixture will save time.

The idea with the growing unit is that sprouting happens in the dark shelves close to the floor. In our situation, the house is heated with in-floor heating so sprouting works best closer to the floor. As the sprouts grow they are moved up to the light shelves. Later, we wondered if we had got it backwards. Even though fluorescent lights do not produce much heat, the ballasts do produce heat. Under normal circumstances it would be better to have the sprouting shelves above the light shelves to make use of the waste heat from the ballasts. If we build this growing unit again, we would put the dark shelves above the ballasts.

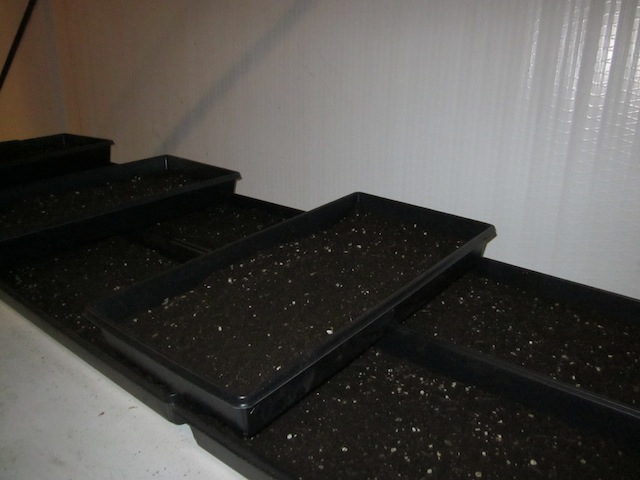
This growing unit is designed to be dry. It is very important to use seedling trays that do not have holes in the bottom. Handle the trays gently to avoid damage because leaky trays cannot be used. Fill half of each tray with sifted compost, peat moss and garden soil. During my research, many sources recommended using 50% compost, 25% peat moss and 25% garden soil. Personally, I will be experimenting with soil mixtures and natural additives but I started with this ratio. To avoid extra work, load 4-12 trays with sifted soil at a time. Dampen the soil in each tray and cover the tray with another seedling tray to keep the soil from drying out.

microgreens-4

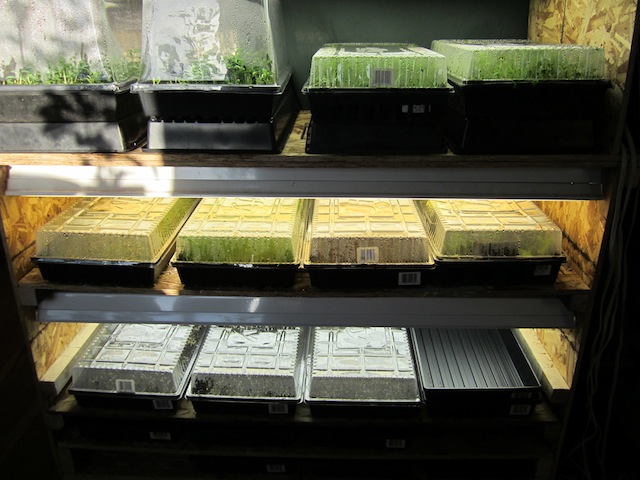
This is our mobile growing unit. There are three light shelves and two dark shelves. If we build this growing unit again we would put the dark shelves above the light ballasts.

microgreens-5

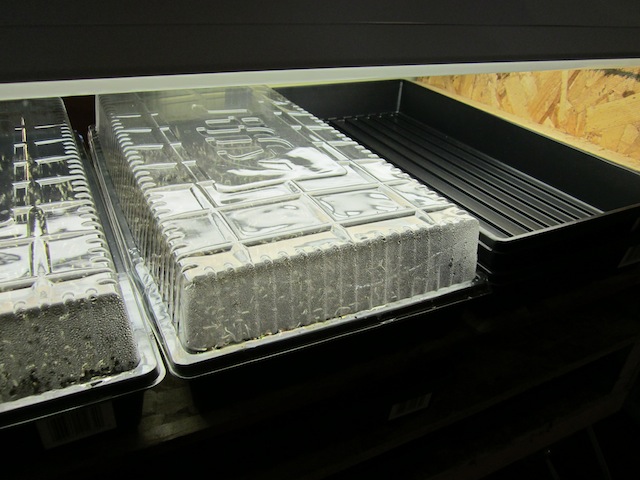
On the right is a tray with seedling that are rooting. The second tray on top is to keep the seedlings in the dark. When the seedlings have rooted the plastic greenhouse top goes on.

The seeds are soaked and sprouted in mason jars for anywhere from 1-3 days depending on the type of seed. (If you have never sprouted in mason jars please see Pantry Foods: Sprouts.) With fresh water, rinse and drain the seeds two or three times a day. I do not plant the seeds until I see some evidence of sprouting. I usually fill one tray per day with soaked seeds. For each tray, soak the following amount of dried seeds:
1/2c organic unhulled sunflower seeds,?unhulled buckwheat seeds or whole garden peas
1/4c microgreen mix (whole unhulled seeds: fenugreek, dill, coriander, brown mustard, yellow mustard, radish, broccoli, cress, chicory, kale, rapine, lettuce, dandelion, amaranth, lentils, peas, etc.)

If you are new to microgreens, start with sunflower, peas and buckwheat seeds which are fast and easy to grow. The peas and buckwheat are better cooked like spinach while the sunflower sprouts are better raw. There are commercial microgreen mixtures which I have never used. I mixed up my own blend with the seeds I have available. For the bulk of sprouting I use beans, legumes and seeds from my dried stores. For variety, I add culinary seeds and old garden seeds to the mix. In general, if your microgreen mix has more small seeds use less volume, and if it has more large seeds use more volume.

When the seeds in the mason jar show signs of sprouting it is time to plant. Spread the seeds evenly over the soil in the tray. Try not to have the seeds touch each other. There is no need to cover the seeds with soil. Using the flat of your hand, gently press the seeds into the soil, if desired. Water the seeds and cover the seeds with another seedling tray. Some growers recommend adding a small amount of dried powdered kelp to the first watering. Some growers recommend a mixture of blood meal, bone meal, lime and kelp to be mixed into the soil before planting. I’m experimenting with both methods to see which additives work best in a given situation.

In 1-3 days, the seedlings will be rooted and pushing up on the top seedling tray. This is the time to move the young seedlings into the light and to cover the tray with a plastic greenhouse cover. The plastic greenhouse cover does a good job of keeping the sprouts moist. If you do need to water, just moisten the soil. Don’t over water the plants. Be careful to not damage the plastic greenhouse covers. Damaged covers do not protect the sprouts from moisture loss and will require more care and watering.

Within a 6-10 days the microgreens will be ready to cut.? A sharp knife or scissors work well to cut the microgreens close the level of the soil. It’s best to cut just before eating the sprouts. First, cut around the edge of the tray and any really large sprouts. The remaining sprouts will close the gaps after just one day of growing. For the next cut, cut through the middle of the tray, followed by cutting in quarters then eighths. After all the greens are cut the soil and roots can be given to chickens or composted.

Once the growing unit is set up, it takes less than 10 minute each day to manage the system and provide your family with delicious fresh sprouts and microgreens! Also, producing bedding plants for your regular garden will be a breeze!

If you are looking for suppliers of seeds I have used The Horse Barn for industrial (seed-oil) sunflower seeds, Nature’s Fare for organic mung beans and Fieldstone Granary for organic beans, legumes and grains. In the past, I have used Mountain Rose Herbs for any type of organic sprouting seed and whole, organic culinary seeds. Recently, I have found a new source for organic sprouting seeds in Nelson, BC called Organic Matters. They have a excellent selection of organic sprouting seeds, beans, legumes and grains.

microgreens-6

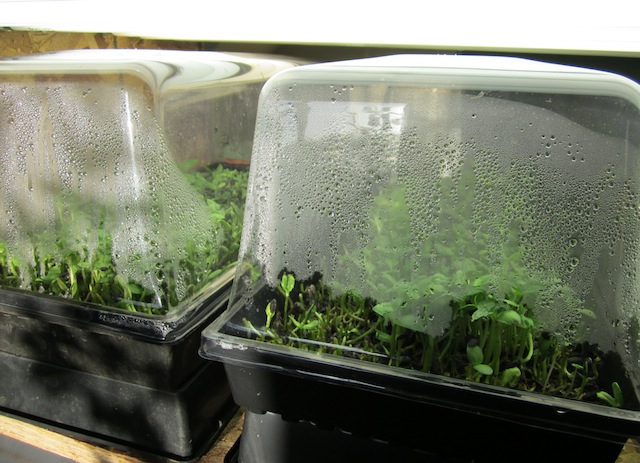
Once the seedlings grow enough to push up on the small greenhouse cover, replace the cover with a larger one. If you get the watering right and don’t open the greenhouse cover very often, you will not have to water at all before harvesting.

Updated April 2, 2015: I said earlier I didn’t use commercial seed blends. Well, I’m a convert now. I have been successfully using Mescluns blends from West Coast Seeds. Excellent microgreens for starting indoors — and after thinning — for transplanting outdoors into cold frames.

We Have Organic, Soy-Free Eggs

egg-bucket

Our eggs come in a number of colors and sizes. We try to feed our hens well so they can produce better eggs.

If you are looking for high quality eggs, we have eggs for sale. Our chickens are a mixed flock of heritage birds: Ameraucana, Buff Orpingtons, Danish Brown Leghorns, Buff Brahams, and Red Rock Cross. This means the egg shells are brown, white and blue.

We feed the chickens certified organic whole grains and peas from Fieldstone Granary and from local suppliers that do not spray. We supplement the chicken’s diet with kelp, oyster shells, sea salt, dolomite lime and kitchen scraps. Occasionally, the chickens get a feast of offal when we slaughter a hog. The chickens are NOT fed any soy products. During the winter the chickens are confined to a greenhouse where they can get sprouted grains, peas and sleepy bugs. During the summer the chickens are free range and get a variety of herbs, forbs, grasses and insects.

We have a small flock so there is only about two to three dozen eggs produced each day, so our egg numbers are limited. We are selling the eggs for $5.00 per dozen. Cash only. We recycle egg cartons, so please bring your old egg cartons.

Heritage Hogs and Ranfurly Farm

skinning-pig

Joel Salatin would be happy to know we had ourselves a hog kill. This was a traditional practice just a few generations ago. Now people are reclaiming the skills of slaughtering and butchering. Here is Chris Harder giving Sonja a quick explanation of skinning a hog.

Near the beginning of August we picked up two, eight week old English Big Black Hogs from Ranfurly Farm. Ranfurly Farm is located near Chase, BC in Turtle Valley. Mike and Margaret Fryatt moved onto the farm just over a year ago, but they have done a lot in a very short time. They are breeders of heritage livestock. They are specializing in pasturing animals and growing part of their animal feed as green crops. Using electric fencing to control access, they let the animals into the green crops for a self-service buffet. Their daughter Jennifer Fryatt and her partner Adam Cooke, moved onto the property and are running the only Community Supported Agriculture (CSA) program in the area that I know about. This makes them a multi-generational farm, which is a very good thing.

hog-parts

This was the first time we cut up an animal bigger than a turkey. Ranfurly Farm doesn't require you to butcher your own animals; they can send the hogs to a butcher for you. Our group just has an insatiable appetite for learning new skills.

At Ranfurly Farm they use electric fences for their pasture management so the hogs were trained to electric fences. We have been using a paddock and a small electric fenced pasture area for the hogs. We feed the hogs organic mixed whole grains from Fieldstone Granary. We soak the grains overnight and feed the mash directly to the hogs and chickens. This soaking improves digestibility and if the hogs do not eat everything the whole grains will sprout producing greens for the animals. We also feed the pigs kitchen and garden waste and the occasional feast of chicken offal. Hogs, like chickens, are omnivores and need animal products to be healthy. Traditionally, hogs would also be fed the waste products from cheese and butter making.

We have never handled hogs before and we have come to love these sweet animals. I can’t understand why someone would dislike hogs. Hogs are very clean animals and, if given the option, they will go to the bathroom in only one area of their living quarters. I don’t know how the two hogs come to a consensus about where to go to the bathroom, but they do.

The hogs were very wary of us at first. They have these big floppy ears that hang over their eyes. I don’t know how they manage to see where they are going. But now when we come, they jump around and bounce their ears so they can see us better. After their fill of soaked grain mash, the hogs will stand still for a back scratching. The hogs will grunt with delight and wiggle their back ends with pleasure, not unlike a dog.

I must admit I am getting attached to Bacon and Sausage. These are the only names I allow the girls to use for the hogs. (We have a policy of never naming livestock destined for our table. At the same time, names such as Bacon and Sausage, helps the children understand where their food comes from.) I don’t know which will win out, growing the sows into breeding stock, or my hunger for homemade smoked bacon.

If you are looking for heritage livestock or pastured beef, pork or lamb, here is their contact information. If you are interested in CSA please contact Jennifer Fryatt and Adam Cooke directly:

Ranfurly Farm
Mike and Margaret Fryatt
797 Bailey Rd, Chase, BC, V0E 1M0
T: 250.679.2735
E: mfryatt(a)hotmail.com
E: marg.fryatt(a)hotmail.com
60km
pastured beef from Galloway cows, pastured pork from English Big Black and Berkshire pigs, fibre from Blueface Leceister sheep and meat from North Country Cheviots Cross sheep, free range eggs from Black Australorps and Silver Laced Wyandottes chickens, breeders for English Big Black, Berkshire pigs and Blueface Leceister sheep; soon to be breeders of Bourbon Reds, Ridley Bronze, and Blue Slate turkeys; soon to be breeders of heritage Sussex and Wyandotte chickens
Jennifer Fryatt and Adam Cooke
E: ranfurlycsa(a)gmail.com
Community Supported Agriculture (CSA) weekly box program for vegetables and pastured poultry

Chicks, Chicks and More Chicks

Last year a neighbor lent us an incubator and we hatched two loads of eggs. The first hatch was Quail eggs which went very well. For the second hatch, we ordered fertile eggs from a small backyard breeder of heritage birds. Unfortunately, this hatch did not go very well. We had what is known as a sticky hatch. This is when something goes wrong with the hatching and the chicks have trouble getting out of the shell. We had about 50% mortality in the shell and in the first few days of life. There was also a number of birth defects in the chicks. This sticky hatch really put us back last year. We ended up having to buy some point of lay hens to get the right number of birds.

A few days ago, we received our order of day old chicks from Miller Hatcheries. The chicks come in the mail from Westlock, AB. When the call from Canada Post came in, we drove down to the post office and picked up the birds. We have found getting live chicks from a respected hatchery will ensure healthy birds and less mortality. We get the chicks without immunization and do not have them de-beaked. Chickens that are not in confinement do not need be de-beaked for their own safety and actually need their beaks for foraging in the pasture. We ordered 50 Cornish Giants, a meat bird, and 50 sexed Red Rock Cross laying hens.

It is very important for the chicks to be kept at a constant temperature, so for the first week we have the chicks in our living room. Shaen got two large cardboard boxes, which he joined together into one very large box. He covered the bottom of the box with a few inches of spelt hulls from Fieldstone Granary. He set up the water and food. We use a standard un-medicated chick starter. When the chicks get a bit bigger we will put them on pasture and a homemade chick scratch made from organic grains from Fieldstone Granary. Shaen uses a red heat lamp for warmth. Miller Hatchery sends detailed instructions about the care of chicks, but Shaen likes watching the chick’s behavior for a better gauge of comfort. If the chicks are crowded around underneath the heat lamp, it is too cold, and he will lower the lamp to increase the temperature. If the chicks are crowded around the perimeter of the box, it is too hot, and he will raise the heat lamp. Shaen likes to see the chicks actively moving around in comfort.

Later we got a call from Rochester Hatchery. They specialize in heritage breeds. Originally, they had no extra birds available for this year, so we got put on their call list for order cancellations. We got the Rochester’s Heritage Group Pack. There is a mixture of 50 Ameraucana, Buff Orpingtons, Danish Brown Leghorns and Buff Brahams. There are a lot of chicks in my living room this week!

Chicken Scratch and Fresh Grain for Home Milling

backyard-chickens

Having a backyard flock, connects us with our food. We become concerned about our flock's health and about the quality of the food we produce. Photo courtesy of www.aholliday.com.

I have been looking for a local organic supplier for chicken feed. We are fortunate to live on an acre of land in Kamloops and can have backyard chickens. Chickens help clear the yard of weeds and pests. They will take kitchen and yard waste and turn it into the best soil available. They produce eggs and meat which adds healthy protein and fat into our family’s diet. Children love the company of chickens. Children learn about responsibility, feeding and watering the birds. They learn about the environment and how they can be a helpful part of the cycle of life.

Presently, the City of Kamloops does not allow chickens on single-family zoned properties. The city has suggested that they would look at site-specific zoning to allow individual property owners to re-zone. Re-zoning is very expensive. Even if you apply for re-zoning, it doesn’t mean you’ll get what you want. Presently, if people want to have a few chickens they face the consequences of breaking the law while others forgo this wonderful addition to their household. How did we get to the point where the government decides if I can have a dog, cat, goat or chicken in my backyard? Why is it illegal to have a useful animal?

The City of Vancouver now allows backyard chickens. The City of Victoria has always allowed backyard flocks. Hopefully, our city officials will see the ecological and social benefits of bringing back livestock into the urban landscape. A few chickens and a small garden starts making people aware of what they are eating and where it is coming from. This new awareness could have a positive effect on local ranchers and farmers as city dwellers start to think about their personal food supply.

grain-mill

Fieldstone Granary has a number of grain mills and flakers.

I drove out to Armstrong, BC to visit Fieldstone Granary. They process only certified organic grains from their farm and a number of other certified organic farms. They are the only certified organic grain processor in the province that can do numerous types of grain and custom processing. They specialize in human consumption spelt, rye and golden flax. They produce livestock and chicken scratch. Spelt hulls can be used as bedding material or garden mulch. They have seeds for green manures and cover crops. We bought half a pallet of organic chicken scratch and a pallet of spelt hulls. The price was very reasonable for organic feed. Our birds went wild finding the gleanings in the spelt hulls!

Fieldstone Granary sells home grain mills and flakers. A good machine is not cheap. The flour, cracked cereal grains and flakes produced with a home mill is superior in quality to anything you can buy. If you use flour, cracked cereal grains or flakes it should be freshly ground. If you don’t know why you should eat freshly ground grains please read: Be Kind to Your Grains.

We bought some spelt and rye. Spelt and rye makes a low gluten flour. My daughter Sonja spent part of her afternoon hand grinding the grain. We will make sour dough starter over the next few days. Any ground flour should be used within four days or stored for later use in the freezer. I am really glad my daughters will know how to make bread using traditional methods with the best grain and flour available.