Seasonal Foods: Frozen Wild Mushrooms

wild-mushroom-1

There is nothing more delicious than wild mushrooms.

There is nothing more delicious than wild mushrooms. Our neighbor Joe Trotta brought over a big box of wild mushrooms for us. Thanks, Joe!

Normally, we saut? the wild mushrooms with some butter and sea salt and eat them right away. With over 20 pounds of wild mushrooms to process, we decided to try Joe’s method of storing mushrooms for winter consumption.

wild-mushroom-2

Cover and cook the mushrooms in butter and sea salt until tender.

8-10c wild mushrooms
1/4c organic butter
1tsp sea salt
Clean and wash off all the dirt from the wild mushrooms and let them dry. In a very large fry pan, cover and simmer the mushrooms in butter and sea salt until very tender. Remove the mushrooms and cool. When the mushrooms are cool, portion the mushrooms into freezer bags suitable for your household needs. The frozen mushrooms are good in soups, stews, omelettes, pizza toppings, side dishes or wherever you normally use canned mushrooms.

wild-mushroom-3

Let the wild mushrooms cool before packaging into freezer bags.

wild-mushroom-4

Package the wild mushrooms in portions suitable for your household.

Making Charcuterie: Photo Essay

GUEST POST by Shaen Cooper

Here are some pictures from making charcuterie last fall. The best hogs for making charcuterie are older, fat sows.

charcuterie-cure-wine-2

This is Joe Trotta’s root cellar. There is wine, two kinds of bacon, cured sausage, and soppressata.

charcuterie-butchery-3

After butchering and cleaning, the hog is processed into cuts of meat. This is a jowel of the hog. It was later salted, smoked and cured.

charcuterie-sausage-1

Part of the hog goes towards fresh sausages. We use natural casings made from intestines.

charcuterie-salting-pork-9

This meat is being salted before smoking and curing.

soppressata-before-pressin

This is the soppressata being “warm cured” before going into the “cold curing” area. Later it will be pressed to remove all the air pockets.

charcuterie-hanging-salami-

This is how to hang salami.

charcuterie-hanging-soppressata-5

This is how the soppressata looks after hanging and pressing.

charcuterie-break-8

Making charcuterie is a lot of work. My Italian friends have taught me the importance of enjoying the work!

charcuterie-cellar-7

It’s exciting to see the cellar full of delicious food!

Winter Foraging and Ice Fishing: Photo Essay

mcconnell-lake-trout-1

We caught five trout at McConnell Lake and ate one for breakfast using our rocket stove.

Our neighbor Joe Trotta invited my family to go ice fishing. We met at McConnell Lake, about fifteen minutes drive from our home. The girls got to ride on a skidoo, towing a sled with our gear, out to the ice fishing holes. I have never ice fished in my life, nor caught a fish. Today was my lucky day. I caught two trout. It seems wondrous that closing in on my fifth decade I can still find delightful new experiences.

getting-there-2

The girls got to ride on a skidoo to the ice fishing holes on the far end of the lake. The skidoo towed a sled with our gear.

The equipment needed for ice fishing is extremely basic. A skidoo isn’t necessary. Shaen and I walked across the lake in about ten minutes while the girls got to enjoy the novelty of a skidoo. It’s easier to walk on the skidoo tracks. During the melt, the ice is safe to walk on but the snow on top of the ice melts. You can get a boot full of cold water if you go off the skidoo tracks. I know because I went off the tracks and got a boot full of cold water! I will bring a spare pair of wool socks next time. Walking across the lake got us thinking that it would be nice to cross-country ski or snow-shoe across the lake too. We could easily pull our fishing gear with a small sled.

cutting-a-hole-3

Here is the equipment for making a hole in the ice and scooping out the ice pieces from the hole. On the right is the ice fishing gear. Simplicity itself.

It took me about ten minutes to cut a hole in the ice and scoop out the pieces of ice. I was out of breath by the end. Some people use manual or powered ice drills but Joe has made a simple cutting tool with a heavy solid bar with a very sharp blade on the tip. The top of the bar has a rope that loops around your arm to avoid losing the cutting pole by accident when you break through the ice. Once the hole is cut, it is easy to re-open the hole if you come back within a few days.

joe's-ice-fishing-gear-4

Joe has been ice fishing for years. He has a small seat and bag for all his gear. He uses live worms and frozen corn for bait. He sometimes uses shrimp to “chum” the trout.

sonja's-fishing-hole-5

Sonja is using a plastic bin for a seat. We use this bin to carry our rocket stove and a supply of fire wood and starter. She has a few pieces of corn which she uses to “chum” the trout.

erika-looking-into-water-6

Joe showed us how to look through the icy water to see the fish below. You get your head right into the hole and shelter your head so your eyes can adjust to the darkness of the water. Erika got a face full of cold water!

breakfast-rocket-stove-7

Shaen is cooking a trout and warming up breakfast on our rocket stove. Erika and I collected deadfall trees from the forest while Sonja helped maintain a fire to keep warm.

I have to say, I really loved being out there, even with a cold, wet foot. The lake was so quiet and still. Erika and I enjoyed dragging out the deadfall trees onto the lake to make a warming fire. When Sonja wasn’t fishing, she whittled sticks and tended the fire. We enjoyed a late breakfast of fresh trout cooked over our rocket stove. If that wasn’t enough, we came home with enough trout for dinner.

erika-holds-mama's-first-fish-8

Ice fishing is very easy and needs very little equipment.

I have recently learned how to enjoy eating fish heads. Fish heads are very nourishing. I also keep the trout liver and any trout roe I might find and eat it raw. I know that might sound gross, but after all the reading I have done about nourishing traditional foods, I have taken to eating the so-called “waste parts” of the fish. It was hard at first. I had to get over my cultural training but now I enjoy eating the fish heads and raw roe. If you are wondering why I would want to learn how to enjoy these foods please see:
Ancient Dietary Wisdom for Tomorrow’s Children
Sacred Foods for Exceptionally Healthy Babies …and Parents, Too!

Pantry Foods: Charcuterie

cured-pork-1

Charcuterie adds a wonderful element to winter pantry food. A small slice of cured meat goes a long way with its rich flavor. With traditional charcuterie there is a natural order to when the cured meats are ready and when the cured meats should be eaten.

“These dry-cured meats and sausages, almost always sliced thin, are dense and chewy, with a strong, dry-cured flavor and smooth, satiny fat. When we eat them, we’re most often eating pork that’s never gone above room temperature, let alone come close to the 150F recommended by government. And yet, properly prepared, these are perfectly safe to eat. There really is nothing similar to eating cured raw meat — it has a flavor and an effect like no other food.”
Charcuterie: The Craft and Salting, Smoking and Curing by Michael Ruhlman

cured-pork-ribs-4

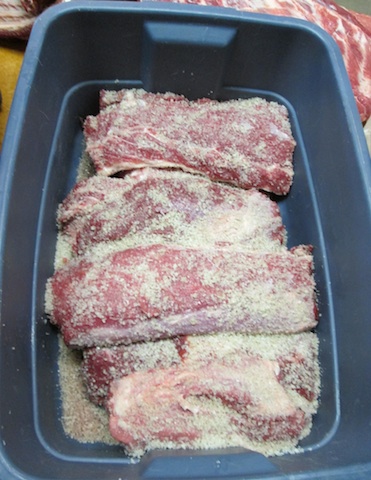
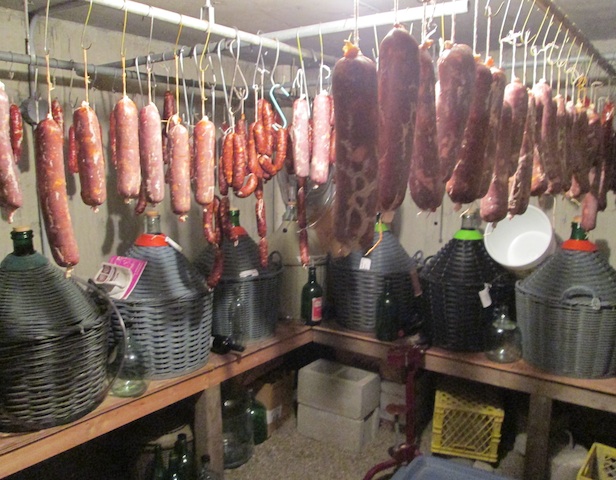
Raw cured ribs are the first cured product to come out of the cellar. Sliced thinly, the sweet meat of the ribs is a wonderful contrast to the salty cure. One rib will satisfy.

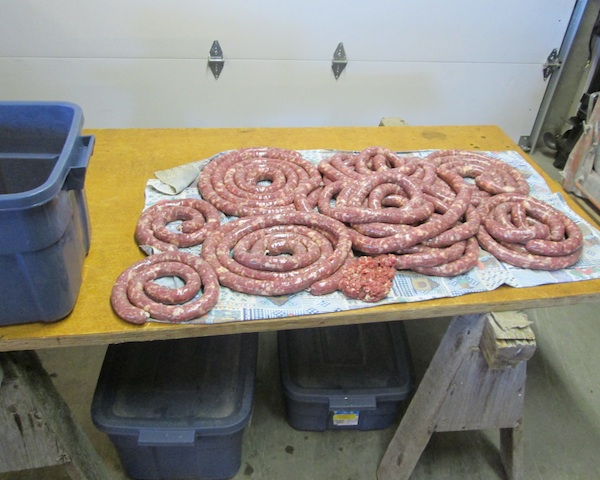
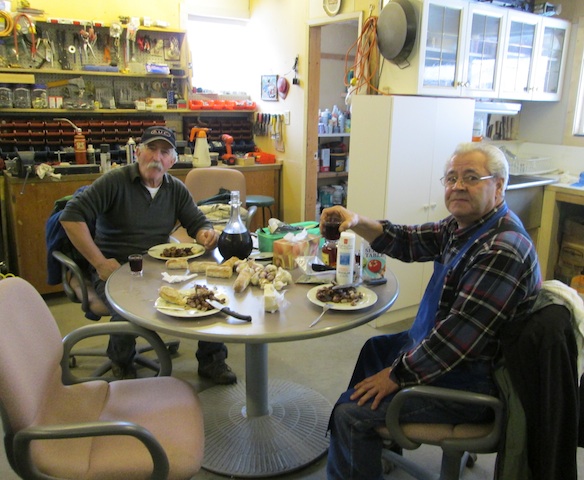
I just wanted to share a few pictures of the cured pork my husband Shaen made with the expert mentoring from Joe Trotta. Charcuterie is not an easy craft to learn from books. Charcuterie is a craft best passed down from the older generation to the younger generation.

If you are interested in learning the craft, I have no books for you, or courses you can take. You will just have to look around and find someone knowledgeable in the craft and someone willing to mentor you in the techniques. If you can find someone to show you how to cure raw meats, the process becomes simple, and the stress of wondering if you are doing it right, is greatly reduced.

Two warnings. Hurry up and learn. Many of the people that know these techniques are older. Many have children that do not value the wisdom that came from the old country and have never learned the craft. These old techniques are dying with the people, and unless we learn their knowledge, the knowledge will pass out of this world.

If you are a professional cook or chef, you will have to empty your cup of knowledge, if you want to learn traditional charcuterie. Everything you think you know about FOODSAFE is wrong regarding these foods. If you come to traditional cured foods with your own ideas of how to do it right, you will likely miss the mark, and mess up the process. Saying “Oh my God, that isn’t safe,” is meaningless and disrespectful to someone who has eaten these foods their whole life.

cured-pork-bacon-5

This is raw cured bacon with sea salt and paprika. The sticks help keep the bacon flat and stop it from curling. This is the second cured product out of the cellar. Very few people have enjoyed the flavor of raw bacon. It can be cooked but you will miss the satiny smoothness of the fat.

“Dry-curing results in a beautiful type of sausage, the most individualistic, idiosyncratic, and temperamental sausage there is, precisely because of its reliance on atmospheric conditions, which change all year round, and the presence of varying microflora in the air.”

cured-pork-2

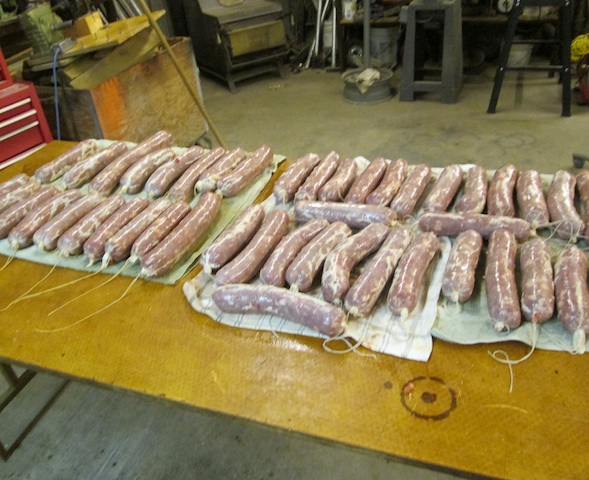
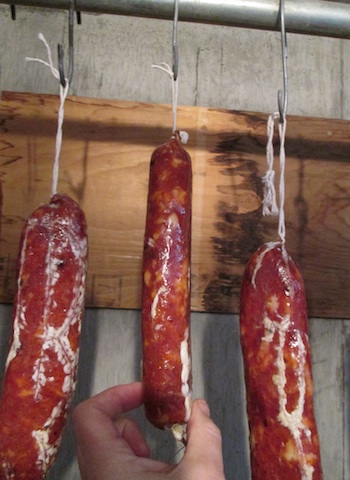
Soppressata is the third cured product out of the cellar. Soppressata is made from raw pork, sea salt and paprika which is stuffed into the pig’s intestine. There is no curing salts or other ingredients. Soppressata’s flat appearance is from pressing to help remove air from the salami.

But when your sausage has dried just right, and you slice it thin, and the interior is a glistening deep crimson red with bright pearly chunks of fat, it is incredibly exciting. This is real mastery over the food we prepare. To make a home-cured pork sausage, with just salt and pepper for seasoning, is a deeply gratifying experience, like making a great wine.”

cured-pork-3

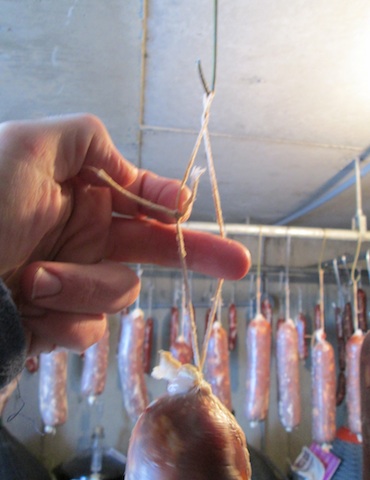
Soppressata is hung by its string on clothes hangers cut into hooks. Soppressata with its white coat is an eerie sight in the cellar. The white coating is safe to eat though traditional Italian sausage makers like Joe wipe the soppressata with vinegar and water to remove the coating.

Mastering the technique of transforming raw meat and fat, whether a sausage or a whole muscle, into something delicious without using heat, enhances your ability to work with all food. This is true craftsmanship, craftsmanship aiming for art, a craft reliant on the cook’s skill and knowledge and, perhaps, a little bit of divine intervention.”

Divine intervention indeed. Or maybe just allowing for the peaceful co-existence of humans with their helpful bacterial friends. When you cure long-term, your household will become colonized with helpful microbiota. If you would like to learn more about traditional Italian curing please see: Pantry Foods: Fast Cured Green Olives.

Pantry Foods: Fast Cured Green Olives

pantry-snack-plate

There is nothing like a pantry snack plate with homemade sauerkraut, Gort’s raw gouda, Vito’s homemade cured sausage, home canned hot banana peppers, and fast cured green olives. Vito is Joe’s friend and a Master of Italian meat curing. You will see more of Vito’s work this winter.

This recipe was taught to Shaen by Joe Trotta, a neighbor. Joe came to Canada from Italy when he was a young man. He brought with him a wealth of traditional food preparation methods from the old country.

5kg fresh green olives, crushed and soaked for at least two weeks
sea salt, to taste
2-3 heads of organic garlic, peeled and sliced
organic oregano, to taste (optional)
organic hot peppers, to taste (optional)
organic extra virgin olive oil, enough to cover

This recipe is for fast cured green olives. Whole olives take 8-9 months to cure. If you crush the olives — which exposes the bitter seeds — the olives will cure within a number of weeks to a month. This method requires a lot of rinsing with fresh clean water so it is best to keep the olive pail in the kitchen for easy rinsing.

  1. Crush olives to expose the seeds. Joe uses a 2 by 4 piece of lumber and removes the seeds. We used the smooth side of a wooden mallet and left the seeds in. Use even pressure and push down on the olives until they “pop” open. Do not pound the life out of the olives and bruise the surface. After crushing all of the olives put the olives into a large food grade plastic pail. Have enough room to place a plate and stone on top, to keep the olives below the water level.
  2. Rinse, rinse and rinse again until the water runs clear. Always mix the olives as you rinse. The more you rinse and mix the olives, the faster the bitterness will leave the olives. Rinse with fresh water several times a day for several weeks until the olives no longer taste bitter and the water runs clear. Always leave the olives soaking in water with the plate and stone on top. Do not expose the olives to the air during soaking. After two weeks, test the olives by taking a small bite. You will want to spit it out if the olive is still bitter. If the olives are bitter continue to soak, rinse and mix. The olives will taste bland when ready.
  3. When the olives taste bland, drain the water thoroughly. Mix the olives with spices, garlic and sea salt to taste. One common spice mixture is oregano, hot peppers, and garlic. Let the olives sit in a warm place for 24-48 hours and adjust the spicing, again. Water will come out of the olives; this is the brine. Normally, more sea salt is needed to make the olives pleasantly salty. Don’t over do the salt. You can always remix the olives and add more salt later, if needed.
  4. Once the spicing and saltiness tastes right, press down the olives into jars, add the brine, and cover with olive oil. The olives will last for months in a cool dark place.
crush-fresh-olives

Use a smooth side of a wooden mallet or a piece of 2 by 4 lumber to crush the fresh green olives. Don’t beat the olives to death or the olive skins will be bruised.

rinse-rinse-again

Remove the plate and stone. Mix and rinse the olives a number of times each day for at least two weeks. After a week or two, try a tiny bite of one olive. The olives are ready when they are no longer bitter and have a bland flavor. Have patience. This step takes time.

garlic-salt-oil

Once the olives taste bland, drain the water. Mix in spices, garlic and sea salt to taste. Let the olives sit in a warm place for 24-48 hours. Retest the olives, and adjust the spices and salt. Usually you will need to add more salt.

jar-olives

After you have adjusted the spice and saltiness of the olives, put the olives in glass jars. Pour some of the brine into each jar and press the olives down firmly. Add olive oil to the top.

This year we made 10kg of olives. That may sound like a lot but next year we will double or triple that amount. Even though I love olives, I stopped eating olives years ago because something used in the commercial processing of olives disagrees with me. These are the best olives I have ever eaten and they don’t make me sick. Fresh olives are available seasonally in early September from Fratelli Foods. You must call early and be put on the order list for olives. I haven’t found a source for organic fresh olives. If there is enough interest in organic olives next season maybe Fratelli Foods will bring them in.

Fratelli Foods
Mario and Peter Pietramala
223 Victoria St, Kamloops, BC, V2C 2A1
T: 250.314.0702

olives-jar-pressed

Compress the olives down as much as you can with your fist or a wooden mallet. Add more olive oil to cover if you are going to be storing for some time.

Frugal Tip: Do not throw out the olive oil after eating the olives. The spices and garlic give the olive oil a rich flavor. I found the olive oil and a small amount of brine great for making Crunchy Kale Chips. Also, the olive oil can be used to jazz up the oil portion for Whole Seed Mustard Dressing.