Pantry Foods: Fast Cured Green Olives

pantry-snack-plate

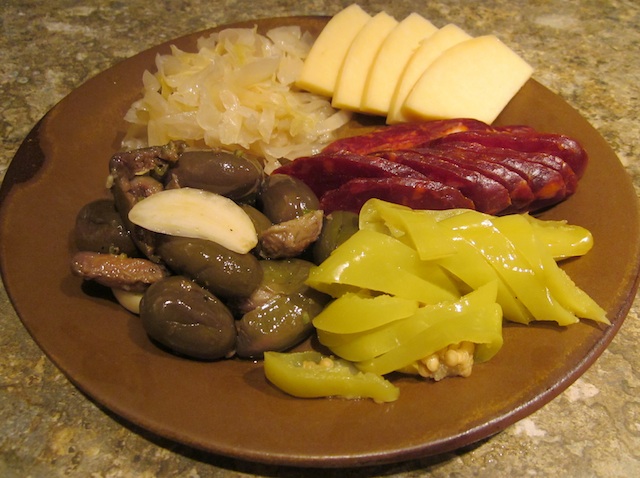
There is nothing like a pantry snack plate with homemade sauerkraut, Gort’s raw gouda, Vito’s homemade cured sausage, home canned hot banana peppers, and fast cured green olives. Vito is Joe’s friend and a Master of Italian meat curing. You will see more of Vito’s work this winter.

This recipe was taught to Shaen by Joe Trotta, a neighbor. Joe came to Canada from Italy when he was a young man. He brought with him a wealth of traditional food preparation methods from the old country.

5kg fresh green olives, crushed and soaked for at least two weeks
sea salt, to taste
2-3 heads of organic garlic, peeled and sliced
organic oregano, to taste (optional)
organic hot peppers, to taste (optional)
organic extra virgin olive oil, enough to cover

This recipe is for fast cured green olives. Whole olives take 8-9 months to cure. If you crush the olives — which exposes the bitter seeds — the olives will cure within a number of weeks to a month. This method requires a lot of rinsing with fresh clean water so it is best to keep the olive pail in the kitchen for easy rinsing.

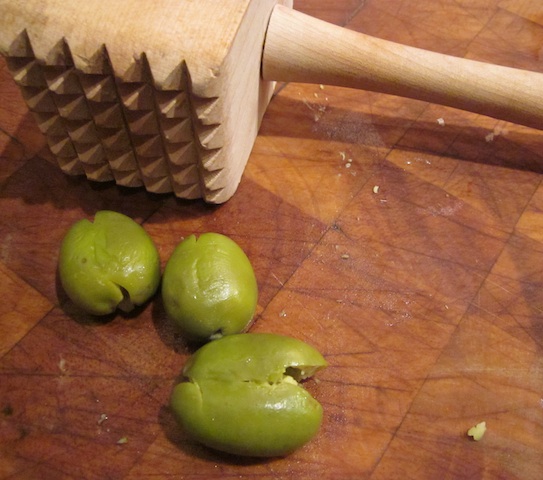
  1. Crush olives to expose the seeds. Joe uses a 2 by 4 piece of lumber and removes the seeds. We used the smooth side of a wooden mallet and left the seeds in. Use even pressure and push down on the olives until they “pop” open. Do not pound the life out of the olives and bruise the surface. After crushing all of the olives put the olives into a large food grade plastic pail. Have enough room to place a plate and stone on top, to keep the olives below the water level.
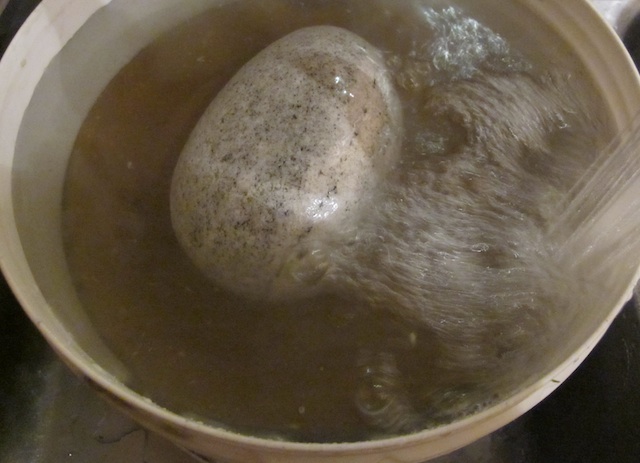
  2. Rinse, rinse and rinse again until the water runs clear. Always mix the olives as you rinse. The more you rinse and mix the olives, the faster the bitterness will leave the olives. Rinse with fresh water several times a day for several weeks until the olives no longer taste bitter and the water runs clear. Always leave the olives soaking in water with the plate and stone on top. Do not expose the olives to the air during soaking. After two weeks, test the olives by taking a small bite. You will want to spit it out if the olive is still bitter. If the olives are bitter continue to soak, rinse and mix. The olives will taste bland when ready.
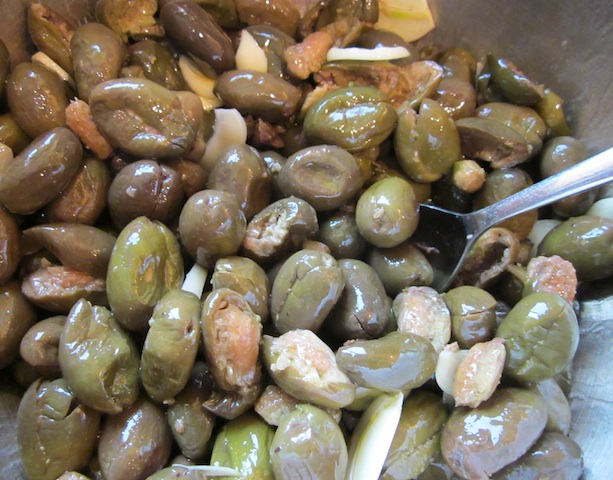
  3. When the olives taste bland, drain the water thoroughly. Mix the olives with spices, garlic and sea salt to taste. One common spice mixture is oregano, hot peppers, and garlic. Let the olives sit in a warm place for 24-48 hours and adjust the spicing, again. Water will come out of the olives; this is the brine. Normally, more sea salt is needed to make the olives pleasantly salty. Don’t over do the salt. You can always remix the olives and add more salt later, if needed.
  4. Once the spicing and saltiness tastes right, press down the olives into jars, add the brine, and cover with olive oil. The olives will last for months in a cool dark place.
crush-fresh-olives

Use a smooth side of a wooden mallet or a piece of 2 by 4 lumber to crush the fresh green olives. Don’t beat the olives to death or the olive skins will be bruised.
rinse-rinse-again

Remove the plate and stone. Mix and rinse the olives a number of times each day for at least two weeks. After a week or two, try a tiny bite of one olive. The olives are ready when they are no longer bitter and have a bland flavor. Have patience. This step takes time.
garlic-salt-oil

Once the olives taste bland, drain the water. Mix in spices, garlic and sea salt to taste. Let the olives sit in a warm place for 24-48 hours. Retest the olives, and adjust the spices and salt. Usually you will need to add more salt.
jar-olives

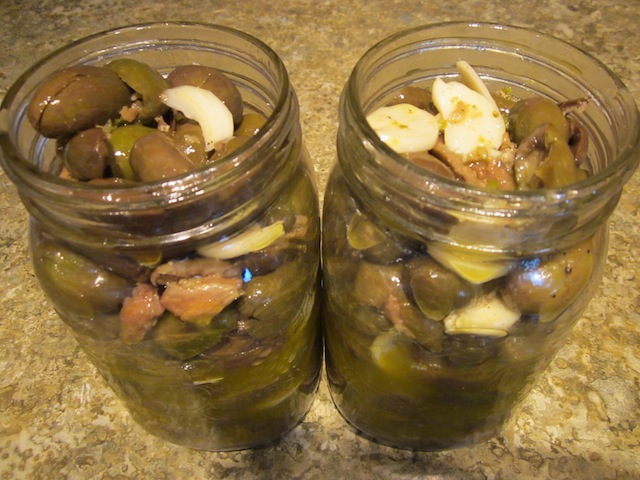
After you have adjusted the spice and saltiness of the olives, put the olives in glass jars. Pour some of the brine into each jar and press the olives down firmly. Add olive oil to the top.

This year we made 10kg of olives. That may sound like a lot but next year we will double or triple that amount. Even though I love olives, I stopped eating olives years ago because something used in the commercial processing of olives disagrees with me. These are the best olives I have ever eaten and they don’t make me sick. Fresh olives are available seasonally in early September from Fratelli Foods. You must call early and be put on the order list for olives. I haven’t found a source for organic fresh olives. If there is enough interest in organic olives next season maybe Fratelli Foods will bring them in.

Fratelli Foods
Mario and Peter Pietramala
223 Victoria St, Kamloops, BC, V2C 2A1
T: 250.314.0702
olives-jar-pressed

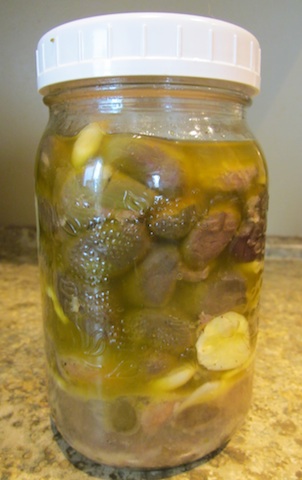
Compress the olives down as much as you can with your fist or a wooden mallet. Add more olive oil to cover if you are going to be storing for some time.

Frugal Tip: Do not throw out the olive oil after eating the olives. The spices and garlic give the olive oil a rich flavor. I found the olive oil and a small amount of brine great for making Crunchy Kale Chips. Also, the olive oil can be used to jazz up the oil portion for Whole Seed Mustard Dressing.

Holiday Dinner Menu

pumpkin-custard

This Pumpkin Custard is topped with an obscene amount of whipped cream, drizzled with bitter chocolate.

I wanted to share the menu I used for Christmas Dinner, but the menu would be good for any holiday dinner. All the ingredients came from organic sources. I have found a new source for organic herbs and spices, mountainroseherbs.com. I was very impressed with the freshness and quality.

This meal was fairly easy to prepare and took about four hours. I usually bake my desserts the day before a special dinner. If I do not have time, I will complete the desserts in the morning so the desserts have time to cool in the fridge before serving. I make the stuffing well in advance, so the flavors can meld together. I cut up all of my vegetables well in advance and set the vegetables aside for later use. I let the roast sit on the counter, seasoned, until I am ready to start my final preparations.

The meal was delicious. We made it to the first dessert with the ice wine but could not get down another bite. This meal served six but could easily have served eight people.

Salad Course
Grated Beets with Whole Seed Mustard Dressing
Green Salad with Whole Seed Mustard Dressing

Main Course
Roasted Grass-fed Lamb with sea salt, fresh rosemary and whole garlic heads
Spicy Yam and Sweet Potato Fries
Savory Nut Stuffing
Vegetable Medley with Raw Cheese
Homemade Red Wine

Dessert Course
Pumpkin Custard with Fresh Whipping Cream
Chocolate Brownie with Cream Cheese Icing
Christmas Butter Tart Squares
Local Icewine
Espresso

Roasted Grass-fed Lamb
Our lamb came from Jocko Creek Ranch. Shaen and Joe slaughtered and wrapped the lamb earlier in December. We used the leg for Christmas dinner.
5 pound grass-fed lamb leg
2 cloves garlic, sliced thin
1tsp unrefined sea salt
1 sprig fresh rosemary, from my indoor herb garden
1-2 garlic heads, in their skins
Allow the grass-fed meat to sit in the fridge for a few days before cooking for best results. The morning of the meal, remove the lamb leg from the fridge and place on the counter to warm to room temperature. Make small incisions into the leg to place the slices of garlic. Place the sprig of fresh rosemary under the leg of lamb. Sprinkle the unrefined sea salt on top. When ready to cook, place the meat thermometer into the leg. Cook at 325F until the meat gets to 120F. Remove from oven and let rest for 5-10 minutes. The meat will continue to cook and the temperature will rise. Peel the garlic cloves and serve with the meat. Slice the meat and serve immediately.

Spicy Yam and Sweet Potato Fries
This recipe is based on a recipe from mountainroseherbs.com. This recipe is NOT safe for someone on the Specific Carbohydrate Diet, but might be a good recipe to try during the reintroduction phase.
1 large organic sweet potato
1 large organic yam
1tsp cumin seeds, freshly ground
1tsp paprika
1tsp sea salt
1T organic extra virgin olive oil (optional)
3T pastured pork fat
Heat oven to 325F. Cut sweet potato and yam into French fries or wedges. In a large bowl mix the spices, sea salt and fat together. Add the cut tubers to the spice mixture and toss well. If you are using fats you may have to use your hand to get the mixture to cover the tubers evenly. Spread evenly over a glass oven pan and bake for 30 minutes until tender and lightly browned.

Vegetable Medley with Raw Cheese
1/8c organic butter
1c organic onion, cut into rings
1c fresh organic mushrooms, whole
1/2c dried morels, crumbled (optional)
1c organic Brussel sprouts, cut in half
1c organic carrots, cut into wedges and julienned
1c organic broccoli flowers, cut into small pieces
some bone broth, juice from roasted meat or red wine
2c raw organic cheese, grated
1/2c organic parsley, chopped finely
This should be the last dish prepared before serving dinner. Have all the vegetables cut and ready for cooking. When the roast is ready, heat the butter in a large cast iron frying pan. Saute the onions and mushrooms until soft. Use a bit of bone broth or the juice from the roasted meat to avoid sticking. Add the Brussel sprouts, carrots, and broccoli. Cook until vegetables are just tender. Stir well and top with raw cheese and parsley. I used Gort’s Gouda for the raw cheese. Slightly heat the cheese and serve.

Pumpkin Custard
I remember the first time I had pumpkin “pie” using whole pumpkin instead of canned pumpkin. I was surprised at the flavor of real pumpkin. The canned pumpkin I used to buy, had “pumpkin” as the only ingredient, but the canned pumpkin had a sweet and slightly spicy flavor. It was then I realized labeling laws are deceptive and allow for the addition of sugar and spices to some given percentage without having to include this information in the ingredient list. I started distrusting labeling. Nevertheless, I would never go back to making pumpkin-based desserts with anything but whole pumpkin. The end product tastes so delicious.

The secret of great pumpkin pie is fresh spices and using a sweet “pie” pumpkin. I always use whole spices and grind them with a mortar and pestle just before use. I keep fresh ginger in the freezer and grate as needed. Since I am using organic ginger I grate skin and all.
1 small organic sweet pumpkin, pre-cooked by baking or steaming, skinned
1/4-1/3 raw local honey, adjust to sweetness of pumpkin
pinch of sea salt
1tsp organic cinnamon
1tsp organic ginger, freshly grated
1/2tsp organic allspice, freshly ground
1/2tsp organic cloves, freshly ground
1/2c whole organic cream, or more
1T Brandy (optional)
In a food processor, smooth out the pumpkin into a paste. Add honey, sea salt and spices and taste for sweetness. Add extra honey if needed, but remember the pie will become sweeter after cooking. Add cream to smooth out the paste. It should be thick but not stiff. Fill 6-8 oven safe glass custard cups and place into a large glass baking dish filled with warm water. Cook at 325F for 30-45 minutes until custard is slightly browned. Cool in the fridge and serve with fresh whipping cream.