Dutch Oven Pizza

dutch-oven-pizza

In the house or at the campsite, making pizza in a Dutch oven is great for summer cooking.

This recipe is safe for someone on the Specific Carbohydrate Diet, GAPS or modified paleo diet.

If I have a chance, I always try new camping equipment at home before taking the new item into the bush. Sometimes the new item never even makes it through the home trial. I have no tolerance for poorly made equipment that doesn’t deliver on its promises.

This week I’ve been testing a new camping Dutch oven called the Lodge 6 Quart Cast Iron Camp Dutch Oven. Keep in mind the Dutch oven is very heavy and would only be suitable for car camping, base camps, boating or canoeing.

Dutch ovens are not new to me. I’ve been using a Dutch oven my mother got at her wedding. That should be a testament to how robust a Dutch oven can be. This new Dutch oven is made for camping with a three legs on the bottom and the top of the lid. The lid is also extra thick and could be used as a fry pan or grill. These legs might not work on some stove tops but it worked well on my gas stove.

I seasoned the new Dutch oven with coconut oil before I started. This requires melting and letting the coconut oil just come to the smoke point and then to completely cool the Dutch oven. After the Dutch oven has cooled completely it is ready for cooking. This seasoning can be redone anytime the Dutch oven starts to stick.

I made an easy, paleo-pizza recipe for the test. This pizza is based on the recipe called? Upsidedown Pizza:

  1. I chopped and prepared the cheese, feta, pineapple, meat and vegetables.
  2. I precooked the meat topping. I browned the salted and finely sliced pork steak first, then added and browned the sliced onions. I set this aside for later.
  3. I took about a pound of meat and mixed it very well with some spices and one egg. After mixing, I made it into a ball which I pressed out to cover the bottom of the newly seasoned Dutch oven. This will be the meat crust of the pizza.
  4. On a medium flame, I cooked the meat crust. I spread evenly about 1/2 can of organic tomato paste while the meat crust was cooking. I did have to be careful not to burn myself on the hot sides of the Dutch oven.
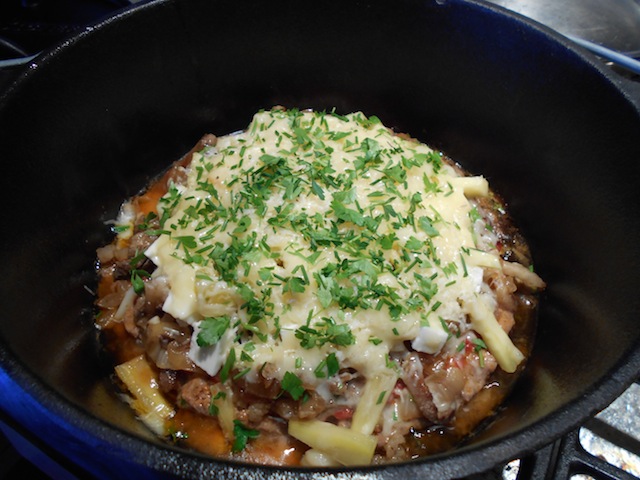
  5. When the meat crust was mostly cooked through I topped the pizza with the cooked meat and onions. Then I added a layer of feta and two other kinds of cheese. I put the lid on and reduced the heat to low and simmered for 10 minutes. I removed the lid a few times to remove any steam (water) that would make the pizza soggy. The water collects on the lid. I dumped this water into the sink.
  6. The pizza was done very quickly and the house was not heated up by using the oven. I added some garden parsley and chives.
  7. This 9″ pizza was very filling. It fed two people to the overfull point. With a side dish the pizza could feed four people.

Ghee Coconut Creamer for Camping

ghee-coffee-creamer

Ghee Coffee Creamer is a good cream substitute for camping season. If you like butter, ghee is stable without refrigeration making it a great camping or emergency food.

It’s camping season. While traveling it can be difficult to find sources of nourishing traditional foods. Usually, I like organic cream in my morning coffee but organic cream can be difficult (or impossible) to find outside of cities. In the past when I couldn’t get quality cream or raw milk I made a coconut-based substitute. This is an updated version of Coconut Coffee Creamer using ghee rather than butter.

Ghee travels and stores much better than butter. If you are going into the backcountry and want buttery trout or wildcrafted greens, ghee is the answer. You can buy commercial organic ghee but making your own will save you about half the cost.

Ghee will also store well as emergency food in your car or camper. If you would like more information about emergency rations please see Emergency Preparation: Fasting or Ketogenic Rations. There’s a link to the whole series about household emergency preparation too.

Homemade Ghee

1 pound unsalted, organic butter
Ghee is very easy to make. Take one pound of unsalted, organic butter and slowly heat in a sauce pan. Simmer the butter for 15-20 minutes skimming off the lactose that bubble to the top. Strain the golden ghee through some cheese cloth to get out the remaining lactose. Some people cook the ghee to a nut brown color for Indian cooking but I prefer using golden ghee.

Ghee Coconut Creamer

1/3c organic coconut oil
1/3c organic creamed coconut
1/3c ghee made from unsalted, organic butter
In a food processor, blend the coconut oil and creamed coconut together with the warm ghee. The Ghee Coconut Creamer should last 1-2 months without refrigeration. 2-3 tablespoons for each liter of coffee is about right.

For more information about the benefits of using coconut products in your daily coffee please see: Coconut Coffee Creamer.

For more tips about nourishing traditional food preparation while traveling please see: Eating Nourishing Traditional Foods While Traveling.

Cauliflower Summer Salad with Crispy Walnuts

lunch-kit-week-3

HAPPY LONGEST DAY! Cauliflower Summer Salad travels well and is a good addition to picnics or camping trips.

This salad reminds me of an old favorite couscous (or bulgur wheat) salad. This salad does not use any grains and is safe for someone on the Specific Carbohydrate Diet, GAPS or a modified Paleo Diet.

Crispy Walnuts

1-2c organic walnuts, coarsely chopped
1T organic coconut oil
1tsp sea salt
In a cast-iron frying pan, melt some coconut oil over a medium heat. Add the walnuts and sea salt and stir while they toast. Don’t overcook. Remove from heat and store in the fridge for snacks or as a topping for salads.

Cauliflower Summer Salad

2-3c Cauliflower Side Dish, chilled
1/2 organic long cucumber, sliced
1/2c garden parley or lovage, chopped
4-6 garden radishes, sliced (optional)
2-3T garden chives, chopped finely (optional)
1/2c organic crispy walnuts, chopped
sea salt and freshly ground pepper, to taste
This salad is good with any fresh vegetables from the garden. Don’t be limited by the normal. Use your imagination and enjoy! In a large bowl, mix the Cauliflower Side. Dish with the vegetables and walnuts. Add sea salt and pepper, if needed.

Walnut Chocolate Toffee

walnut-chocolate-toffee

Walnuts are one of the few nuts that can compete against the strong flavors in bitter chocolate. The dark chocolate contrasts nicely with this sweet, buttery dessert. This hard candy sits on top of the nut layer giving it a crunchy walnut bottom.

This recipe reminds me of Almond Roca without the almonds. The recipe would also be very nice with almonds instead of walnuts.

Nut Layer
1c organic walnuts, finely chopped
3T organic butter
1/2tsp sea salt

Candy Topping
1/4c organic butter
1/4c local honey
1/2tsp sea salt
1T organic cream
1T organic vanilla extract
1/4c organic 70% dark chocolate, pieces

In a cast iron frying pan warm the butter and sea salt. Add the finely chopped walnuts and stir for 6-8 minutes while the nuts brown. Line a 8″x8″ glass baking tray with wax paper. (Butter the wax paper if you make a soft, chewy candy to avoid sticking.) Press the nuts down into the tray. Put the tray into the fridge to continue cooling while making the candy topping.

Making toffee is a bit of a science and a bit of an art. Some people use the cooking time or temperature to decide if the toffee is ready. Others use the color of the toffee is tell what level of softness or hardness has been achieved. Another method is to drop a small amount of toffee into a bowl of cold water and test the firmness of the toffee between the thumb and forefinger. I find using the cooking time, the color of the toffee and the water test (when in doubt) works best for me.

In a sauce pan, warm butter, honey and sea salt and bring to a boil. Stir all the time and boil for 3-5 minutes. A longer boiling time will result in a harder candy. Remove the candy from the heat and add the cream and vanilla extract and mix well. Be careful, the hot mixture will foam up. Put the chocolate pieces into a 1c Pyrex measuring cup. Place the measuring cup into a sauce pan partly filled with water. Gently warm the sauce pan over low heat until the chocolate pieces are just melted.

Remove the tray of nuts from the fridge and spoon the hot candy topping onto the nut base. If the candy is soft it will melt into the nuts. If the candy is hard it will sit on top of the nut layer. Let this layer cool before adding the melted chocolate to the top of the candy. Spoon on the chocolate with a wavy motion to achieve an interesting pattern. Let the candy cool before removing from the tray. Remove the candy from the tray by grabbing onto the sides of the wax paper. Place the candy on a flat surface for cutting or breaking into pieces. Some of the nuts may not stick to the candy. These nuts can be reused to make more candy.

PLEASE NOTE: Adding more cream results in a consistency of caramel. Adding less cream, or none at all, will result in more of a brittle-like texture.

walnut-chocolate-toffee-2

When the toffee has cooled add the chocolate topping. With a teaspoon use a wavy motion to achieve an interesting pattern.

walnut-chocolate-toffee-3

This candy has been cooked for a shorter period of time resulting in a soft, chewy candy that melts into the nut layer. If you are going for a soft chewy candy, butter the wax paper to avoid sticking.

Seasonal Foods: Cellar Beet Borscht

root-vegetable-soup

Now is the time to finish off any root vegetables that may be hiding in the root cellar.

The piles of snow are disappearing around Kamloops. The nights are still cold. I’m starting to see early signs of spring in the large groups of birds that stop and frenetically feed at the GO BOX Permaculture Project before moving on to the northern breeding grounds. I’m starting to hear the morning chirping of the birds and the beginning of green grass struggling to grow on south facing slopes. Now is the time to finish off any foods that are still sitting in the root cellar. Soon the first of the early spring greens will be coming up in the cold frames. Tasty weeds such as dandelion and chickweed will bless our table.

2-3T organic butter or pastured lard
1 large cellar onion, chopped
1-2 stalks organic celery, chopped
1tsp organic caraway seeds, freshly ground (optional)
1 organic bay leaf
1tsp sea salt
1tsp organic dill weed
1-2 medium cellar carrots, chopped
2-3 large cellar beets, chopped
6-8 frozen garden Roma tomatoes, skins removed
3-4c homemade bone broth
Saute the onions, celery, carrots, sea salt and spices in the butter or lard until soft. Add the beets, bone broth and frozen tomatoes. As the tomatoes unfreeze it’s easy to remove their skins, if desired. Cover and simmer the stew until the beets are tender. Serve with kimchi or sauerkraut. Some people like borscht with sour cream or yogurt or even a tablespoon of cider vinegar or master tonic.